Lander
A Lander is a web page designed to catch visitor's attention. You should do your best to convince visitors that your offer is exactly what they are looking for.
Before adding your lander to Maxconv, make sure your lander is publicly accessible.
Adding Lander
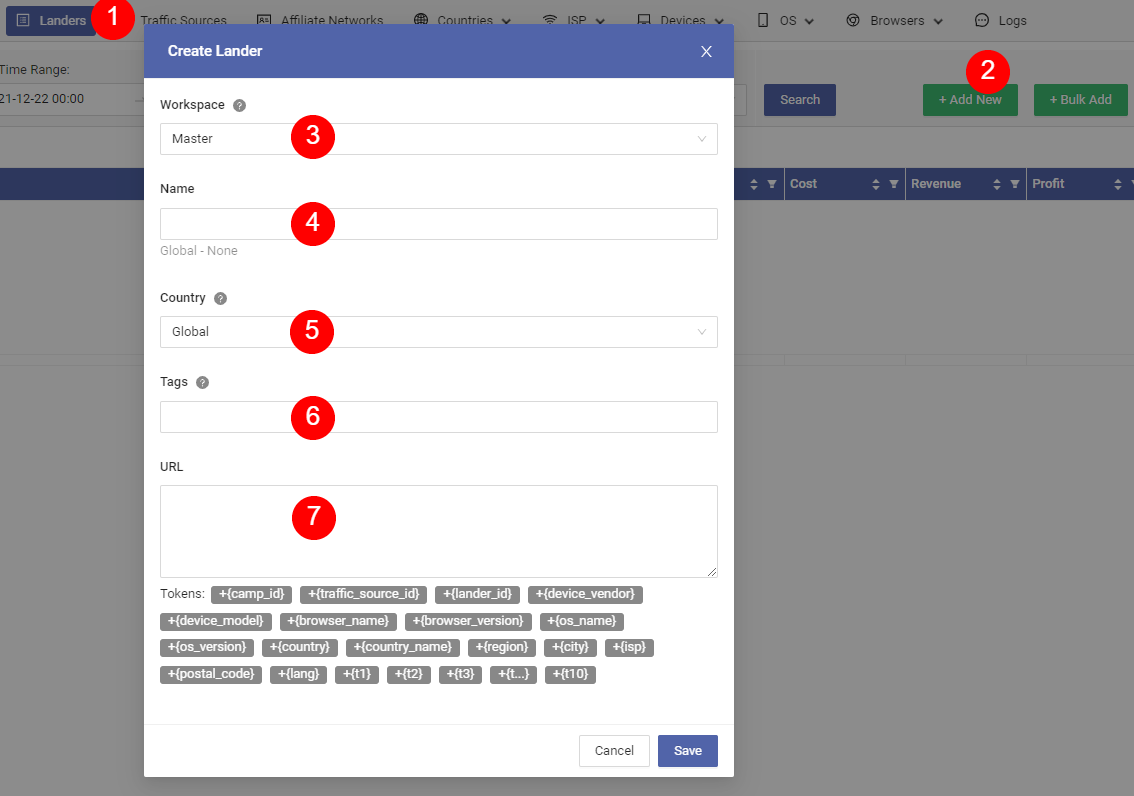
Click the Landers menu in the navigator.
On the landers page, click the green Add New button to open editor modal.
Choose workspace that this lander will be assigned to.
Type your lander name.
Country of this lander. This selection only help managing your data, it has no effect on traffic distribution.
Lander tags.
Full lander url, you can pass additional information to lander by clicking the tokens under the url textarea.
Click the Save button to add it.
Lander Anti-Spy Script
In regular scenario, everyone can see your lander if they know the link, to prevent spy activities from your competitors, MaxConv provides a anti-spy script, which can be used to block access that not comes from campaign link.
To enable lander anti-spy, follow these steps:
When creating/editing lander, make sure to add &lp_key={lp_key} to your lander url, MaxConv will generate a unique key for each visitor when your lander contains lp_key parameter.
Copy the anti-spy script, add it to the top of your lander source code.
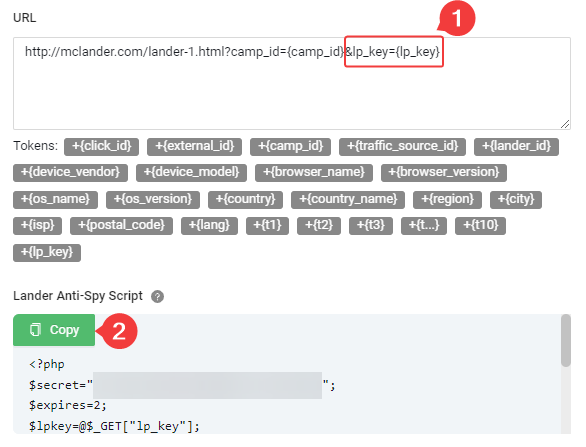
The anti-spy script is a php script, so you need to change your lander suffix to .php, and your lander should be hosted on a php enabled server.
Bulk Adding
The lander bulk adding feature is designed to save your time when it is required to create a large amount of lander.
To add multiple landers at a once, follow these steps.
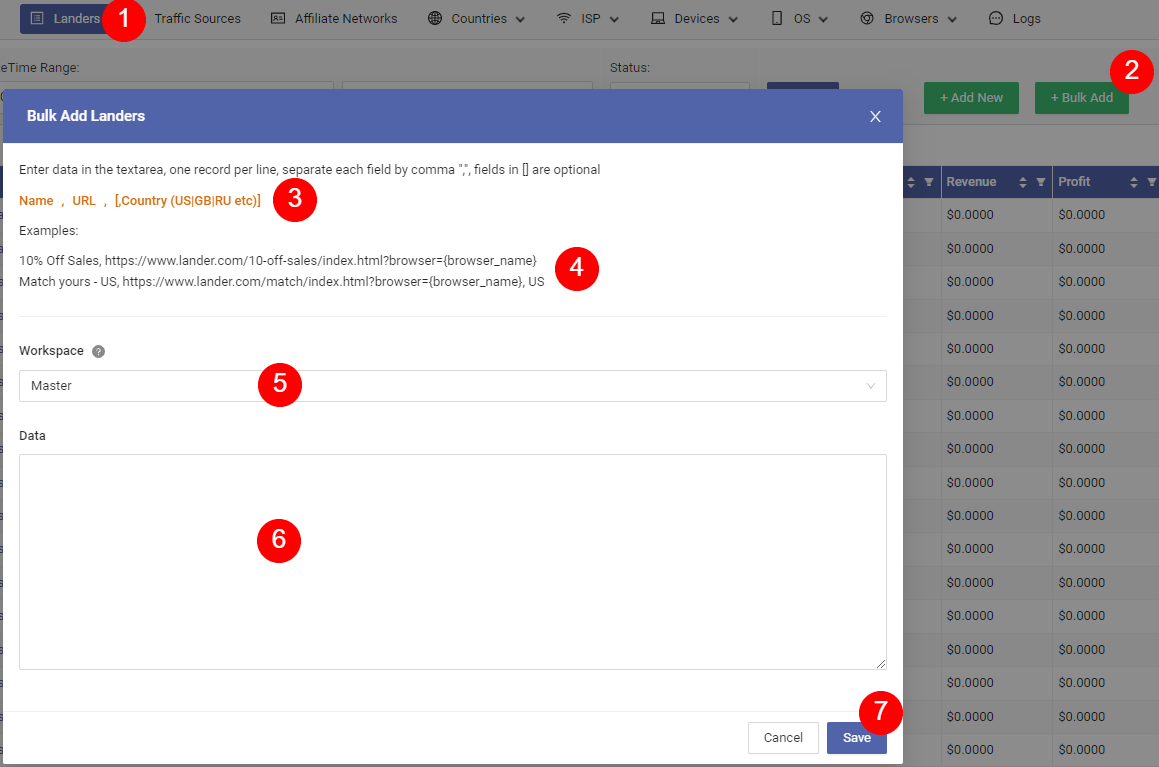
Click Landers in the top navigator menu to go the lander page.
Click the green Bulk Add button on the right of search area to open the adding modal.
Read the adding format before continue, you should enter data by the following format one per line:
Name, URL, [,Country (US|GB|RU etc)]The Country is optional and case-insensitive, if not specified, the country will be set as "Global"
tipThe full country code list can be found in https://en.wikipedia.org/wiki/ISO_3166-1_alpha-2#Officially_assigned_code_elements
Read examples.
Global lander:
10% Off Sales, https://www.lander.com/10-off-sales/index.html?browser={browser_name}United States (US) lander:
Match yours - US, https://www.lander.com/match/index.html?browser={browser_name}, US
Choose the workspace that your landers will be assigned to.
Enter lander details one per line
Click Save button to add them.
Add Click URLs to Lander
A important step for landers is to add Maxconv click URLs, which is required for correct clicks tracking and redirecting.
The most commonly used links is:
URL that rotate all offers:
https://[YOUR-DOMAIN]/clickUse this url as your CTA link will choose one of your offers and redirect visitors to that offer.
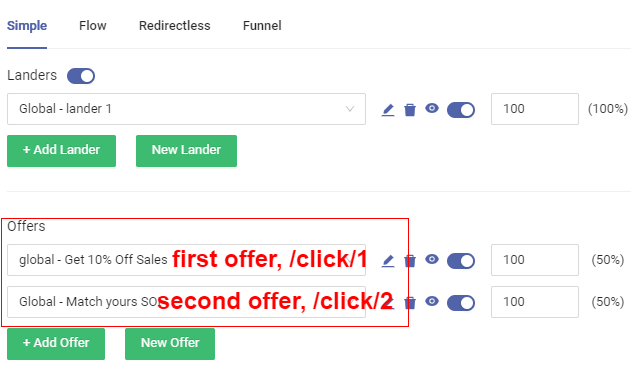
Offer specified url:
https://[YOUR-DOMAIN]/click/1This url is used to redirect visitors to specific offer, for example, the /clicl/1 will lead visitors to the first offer
the the /clicl/2 will lead visitors to the second offer
...etc
The order is set in your campaign settings, like the following setting
More click urls can be found in camapaign links box as below:
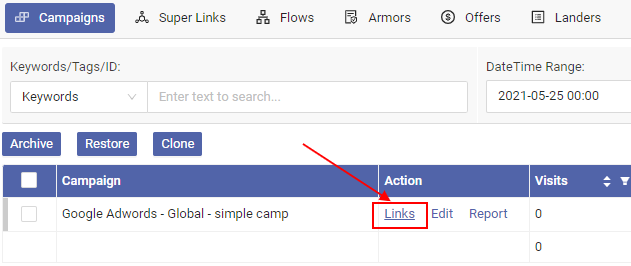
In campaigns page, find your campaign in the table list, click the Links button in action column. A box with all necessary links and steps will pop up.
Pass Dynamic Data
Sometimes you may need to show some dedicated information to get more attention from visitors. use Maxconv dynamic data passing to achieve it.
1. Set URL tokens to your lander url.
Let's say you want to display visitor's browser name on lander, your should add {browser_name} token to the lander url.

Then when visitor comes to your campaign and redirected to your lander, Maxconv will parse their information, replace {browser_name} with real browser name(such as FireFox). So the real lander url that visitor watching become:
https://www.lander.com/10-off-sales/index.html?browser=FireFox
2. Add Script to Display Data
Now the lander url contains the data you want to show, so just use javascript to get it and show it.
<html>
    <head>
        <!--function-->
        <script type="text/javascript">
            function getUrlParam(name) {
                try {
                    var val = decodeURIComponent((new RegExp("[?|&]" + name + "=([^&#]+?)(&|#|$)").exec(win.location.search) || ["", ""])[1].replace(/\+/g, "%20"));
                    return ("" == val && "undefined" != typeof arguments[1]) ? arguments[1] : val;
                } catch (e) {
                    return "undefined" != typeof arguments[1] ? arguments[1] : "";
                }
            }
        </script>
    </head>

    <body>
        <!--print data in appropriate place-->
        <p>All users using <script>document.write(getUrlParam("browser"));</script> are qualified  for 10% off sales.</p>
    </body>
</html>
Passing Static Data from a Lander to Offer
Static data can be passed to offer by adding the parameters supported by your affiliate network to regular click url.
The regular click url looks like:
https://your-domain/click
Add any parameters and their values to click url, they will be passed through to offer, for exmaple:
https://your-domain/click?s3=my-lander-1
Then the final offer url that visitors arrvied will be like:
https://offer-domain/awesome-offer?s2=...&s3=my-lander-1