General
The campaign is the most important part of Maxconv tracking, in this sections, we will introduce the "general" part of campaign setting.
Settings
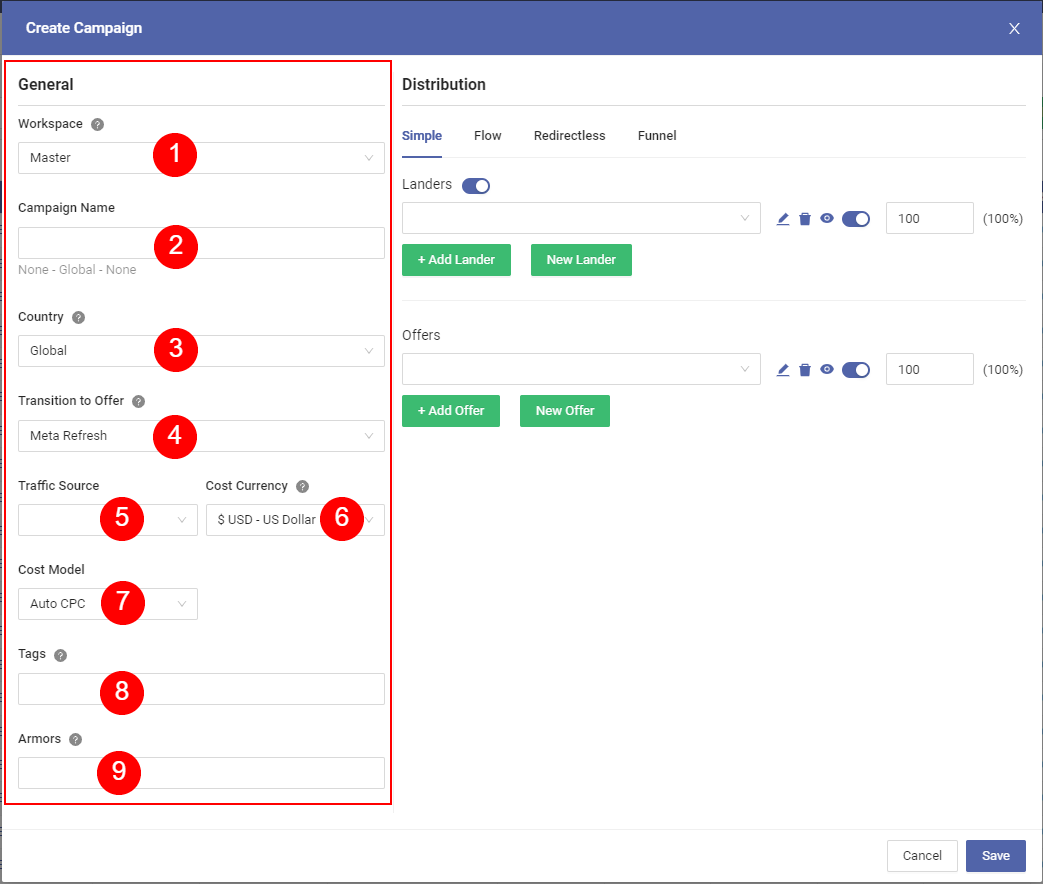
Select the workspace that this campaign will be assigned to.
Enter the campaign name.
Choose the country that this campaign will runs on.
noteThis option is only used for organizational purposes, it has no effect on traffic distribution.
Choose the redirect method from lander to offer.
tipThe transition to offer option only apply on the transition that from lander to offer, or campaign to offer.
Full supported methods are listed below.
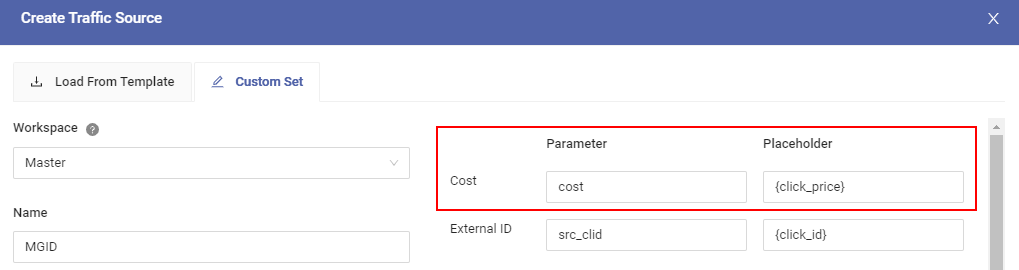
Choose the traffic source that this campaign will run on, Maxconv use this option to build the token query paramters of campaign link.
Choose the cost currency. Default is USD. supported currency: USD,EUR,JPY,GBP,CNY,RUB,AUD,CAD,HKD,SGD.
Select the cost model. Full supported models are listed below.
Campaign tags.
Choose armors that this campaign should be protected by. Read Armor Documentation for how to setup armor.
The other side of editor is "Distribution" section, which decides the campaign type the traffic flow. Read corresponding chapter to learn more.
Transition to Offer (Redirect Methods)
Maxconv support following methods.
302
This is the default option. 302 redirect is performed by HTTP status code of 302, which send a visitor directly to destination.
Meta Refresh
This redirect option is performed by a meta tag in the head of HTML page, indicating browser to refresh and load the new URL.
Double Meta Refresh
Double meta refresh is twice performed meta refresh. It goes like first meta refresh -> second meta refresh -> offer, the visitor goes to your offer link with the referrer from the second meta refresh, not your original lander or campaign.
So this redirect method is mostly used for hiding your lander/campaign url.
It is also the slowest way.
Cost Model
Maxconv support tracking cost data by following models.
Auto
The Auto cost model(including AutoCPC and AutoCPM) can automatically collecting cost data from traffic source by their cost token setting.
We highly recommend using this option if your traffic source support cost value passes.
CPC

With the CPC(Cost-Per-Click) model, you are required to enter the cost value for each click, everytime a visitor reaching to your campaign link, Maxconv will add that value to the campaign costs.
CPM

The CPM, aka Cost-Per-Mille(thousand), is a cost model that pay for a thousand ad impressions when buying traffic.
Every 1000 times that Maxconv impression pixel loaded, the cpm value you provided will be added to the campaign costs.
CPA

The CPA(Cost-Per-Action) is a cost model that pay for single user action(such as download, signup, purchase...etc) when buying traffic.
When Maxconv get conversion notice(by postback or pixel), the cpa value you provided will be added to the campaign costs. (The offer payout value will be added to campaign revenue too 😉).
Revenue Share

The Revenue Share cost model is a little more complicated, it works like CPA(Cost-Per-Action), but the cost for action is dynamic. With this cost model, you need to provide a % value.
Everytime you receive offer payout from conversion, the % of payout will be calculated as the campaign cost.
Let's say you set 60% in the revenue share, when your offer payout is $3, then your cost for every conversion is $3 * 60% = $1.8.