Part I - Basic
Before creating a MaxConv campaign, you must complete the previous steps to add the necessary elements:
To create campaign in MaxConv, perform follow steps:

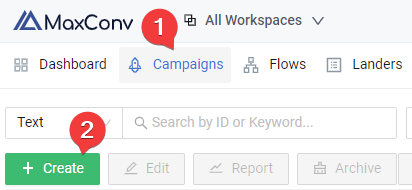
Go to the Campaigns menu in MaxConv dashboard.
Click the Create button.
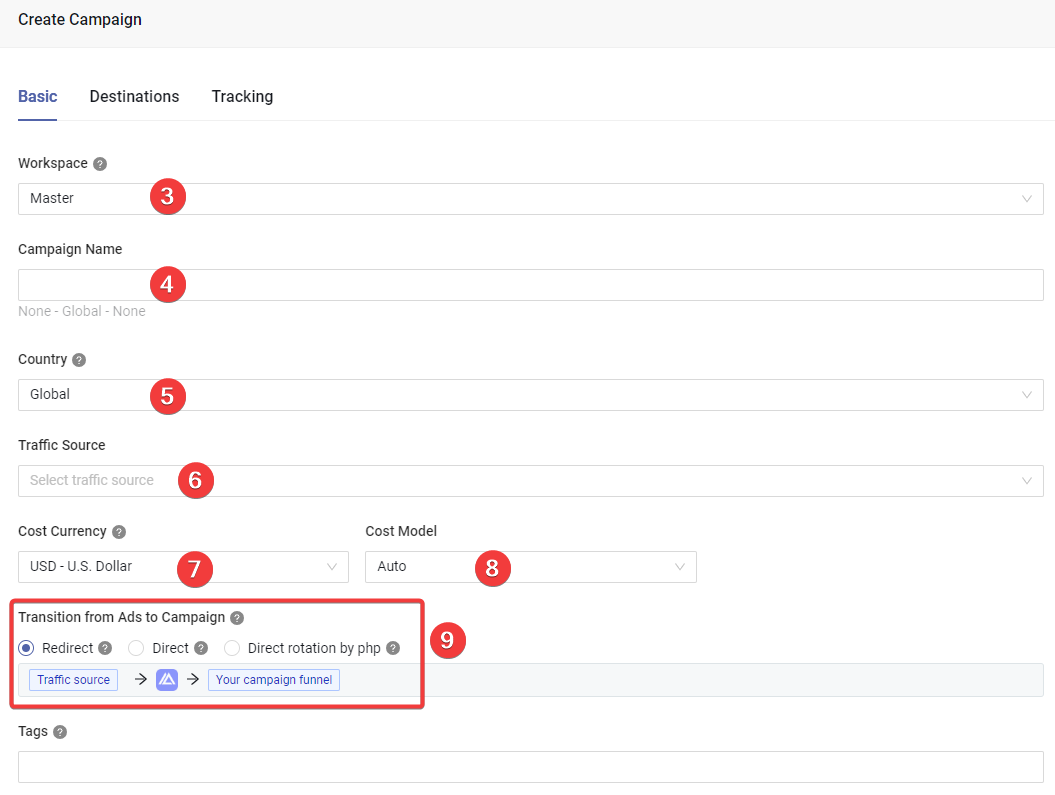
A creation form will appear, the form includes three tabs: Basic, Destinations and Tracking

Choose the workspace that this element should be assigned to.
Type the campaign name in the Name field.
(Optional) Choose the country for this campaign, this field is only used for organizational purposes and does not affect the traffic distribution in any way. If your campaign is intended for multiple GEOs, use the Global option.
tipWhen changing the country field of the campaign, the Lander and Offer drop down menus will be updated, only the lander or offer with the same country as the campaign will be included in the drop down list.
Choose a traffic source that you have previously created. The traffic source's name will be automatically added as a prefix to the campaign's name.
Choose the cost currency.
Select the cost model.
Auto: The auto cost model will track cost via traffic source parameter, or via integration api.
CPC: Cost-per-click model, where you pay for every time a user clicks on an ad.
CPA: Cost-per-action model adds cost to your campaign every time a successful post-back is sent to the traffic source.
Revenue Share: This model adds cost to the campaign by sharing a fixed percentage of the offer payout.
Choose the transition method from ad to campaign
Redirect: The classic redirection method, visitors go to MaxConv campaign link after clicking ad, campaign link then redirects them to campaign funnel. Split testing is supported on this method.
Direct: Visitors go to the campaign funnel after clicking ad, there is no tracker redirection between ad and campaign funnel, however, split testing is not supported on this method.
Direct rotation by php: Visitors go to the campaign funnel after clicking ad, there is no tracker redirection between ad and campaign funnel, split testing is also supported on this method, but you need a php-enabled server to host MaxConv php client.

(Optional) Add tags to enhance search functionality.
Edit advanced settings for this campaign, this section includes the following settings:
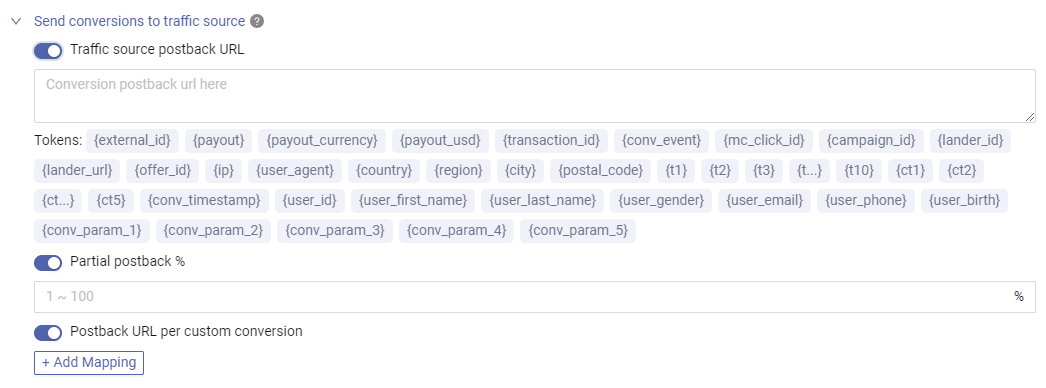
Send conversions to traffic source

Set unique postback for this campaign, if one of these settings is enabled, it will be used instead of the traffic source default postback settings.
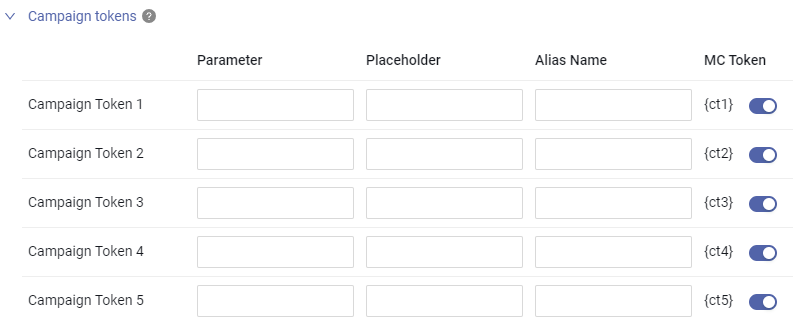
Campaign token

Set unique traffic source parameter you want to track for this campaign.
You can also hardcode any value in the Placeholder field of the campaign token, these values will also be recorded, such usage will make the campaign token work like campaign metadata. It's extremely useful when combined with postback URL.
Google-certified tracking
MaxConv is a Google certified tracker, you can generate a Google certified click tracker link by enabling this option.
Learn more about Google certified tracking
Armors
Assign armors to this campaign to stop unwanted traffic.
Notes
Type your internal notes for this campaign.
FAQ
1. Can I use my own domain to get certified link?
No, the google certification is at the domain level, adding your domain to our tracking platform does not automatically certify it, you have to use our certified domain.
2. Do I need to assign armor to each campaign if I have set that armor as global armor?
No, you don't need to assign global armors to campaigns. Global armors are automatically applied to all campaigns.