Multi-steps Lander Tracking
Multi-step lander is a sequence of pages that a visitor must go through before seeing the actual call-to-action button. For instance:
After setting up the tracking, this entire journey will be recorded as one visit and one click in MaxConv.
Before we start, you need to understand three concepts: Entry lander, Sub landers and Final lander
Entry lander: This lander is where visitors arrive after clicking the ad. In the above example,
Lander with welcome messageis the "Entry lander".Sub landers: All landers that visitors go through after the "Entry lander" are called "Sub landers". In the above example,
Lander with a surveyandLander with a opt-in formare "Sub landers".Final lander: The lander with a CTA button to the offer is the "Final Lander". In the above example,
Lander with a CTA button to offeris the "Final lander".
Setting Up tracking
To set up tracking for multi-step landers, perform the following steps.

Click the Create button on the Landers page, add the Entry lander to MaxConv, do not add Sub landers and Final lander.
Create a campaign, provide basic information, set transition method to Direct or one of redirect methods. Let's set to Direct in this example.
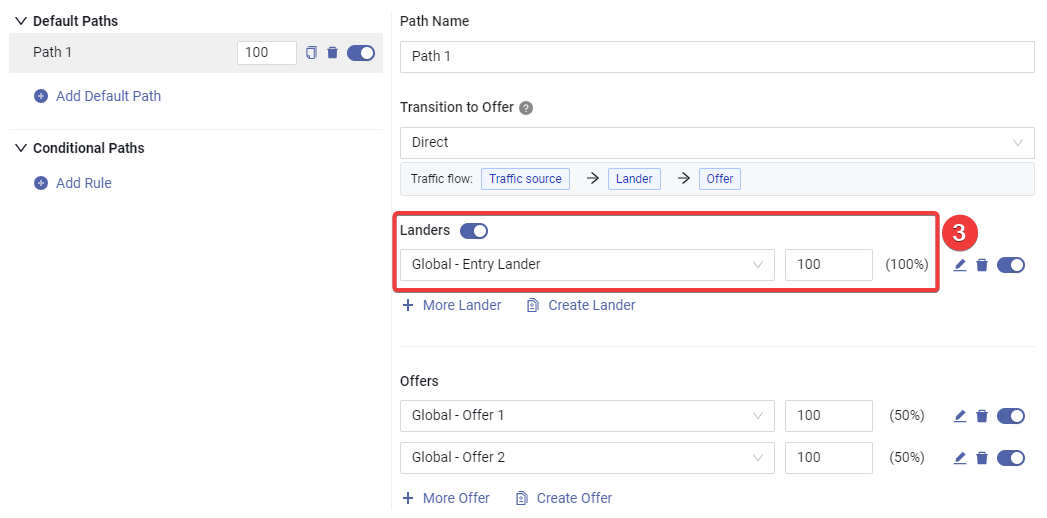
When setting Destinations of campaign, set only Entry lander in the lander section.
Click Save button to create campaign, you will be able to see tracking details in the Tracking tab.
![]()
Choose your preferred tracking domain.
Choose a lander or offer that you want to promote.
Copy the campaign link, and use it to set up campaign in the ad network.
Copy the tracking script, put it between
<head>...</head>of Entry lander's html.Connect Entry lander with other Sub landers by using the sub lander's URL with a extra parameter
mc_sub=1, so the visit won't be duplicated, there is no need to add tracking script to sub landers. For example, to send visitors to the Lander with a survey, use following code in the entry lander:<a href="lander-with-survey.html?mc_sub=1">Take Survey!</a>(Optional) If you want to trigger a conversion on a sub page, you need to copy the tracking script and paste it into the HTML of the sub-lander, then use the following code to trigger the conversion, placing it after the tracking code.
maxconv(function(){
    maxconv("logConversion");
});
You can also record additional information such as payout. Learn more about tracking script customization
![]()
- Copy the tracking script, add it between
<head>...</head>of Final Lander HTML, then copy the appropriate click URL, add it to the CTA button.
All set! You can now use the campaign URL to start advertising on the Ad Network.
Track sub-lander Views
You may want to know how many visitors arrived at a specific sub-lander, or how many of them clicked a specific button, so you can get better insight into your entire funnel, luckily, MaxConv provides custom event goal feature, which can help tracking it.
Follow these steps to setup tracking:
Decide which specific landing page you want to track, for example, let's say you want to track how many visitors arrived at Lander with survey result.
Copy the tracking script and paste it to the
<head>...</head>section of that lander. In this example, you should add tracking script to Lander with survey result.Use the following js code template to log a custom event:
maxconv(function(){
    maxconv("logEvent", "YOUR-EVENT-NAME");
});
Where
YOUR-EVENT-NAMEcan be any event name, for example -survey-done, remember the event name here, you will need it in subsequent steps.The head section of the lander should look like below:
<!--Optional, send client hints to get accurate device data-->
<meta http-equiv="delegate-ch" content="sec-ch-ua https://YOUR-DOMAIN.COM; sec-ch-ua-mobile https://YOUR-DOMAIN.COM; sec-ch-ua-arch https://YOUR-DOMAIN.COM; sec-ch-ua-model https://YOUR-DOMAIN.COM; sec-ch-ua-platform https://YOUR-DOMAIN.COM; sec-ch-ua-platform-version https://YOUR-DOMAIN.COM; sec-ch-ua-bitness https://YOUR-DOMAIN.COM; sec-ch-ua-full-version-list https://YOUR-DOMAIN.COM; sec-ch-ua-full-version https://YOUR-DOMAIN.COM" />

<!-- MaxConv Tracking Script Base Code-->
<script>!function(w,d,o,n,c){w[o]=w[o]||function(){(w[o].q=w[o].q||[]).push(arguments)};var s=d.createElement(n),t=d.getElementsByTagName(n)[0];s.async=!0;s.defer=!0;s.src="https://YOUR-DOMAIN.COM/t/t.js";t.parentNode.insertBefore(s,t);}(window,document,"maxconv","script");</script>
<noscript><link rel="stylesheet" href="https://YOUR-DOMAIN.COM/t/t.css?mc_ns=1" /></noscript>
<!-- End MaxConv Tracking Script Base Code-->

<!--fire custom event-->
<script>
    maxconv(function(){
        maxconv("logEvent", "survey-done");
    });
</script>
Learn more about Tracking Script Customization
Now every time a visitor arrives at Lander with survey result, MaxConv will record a
survey-donecustom event. But it won't show up in report, you need to create a custom event goal.

Click Measurement >> Goal menu on the top right of MaxConv dashboard.
Click the Create button on the Goal page.
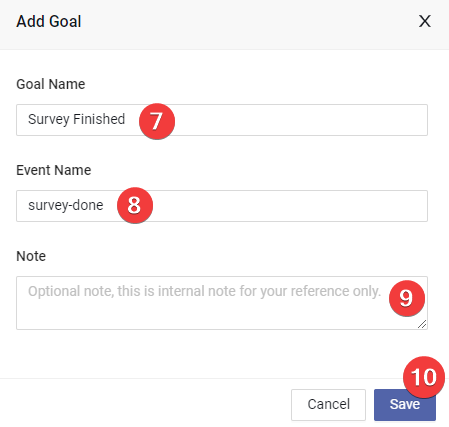
Type the goal name, this will be the column name in the report table.
Type the event name, this should be the same value you put in the Step 3.
(Optional) Type the internal note.
Click Save button to create goal.

- Now you need to enable the goal column in report table, click the Columns button on the top right of table.
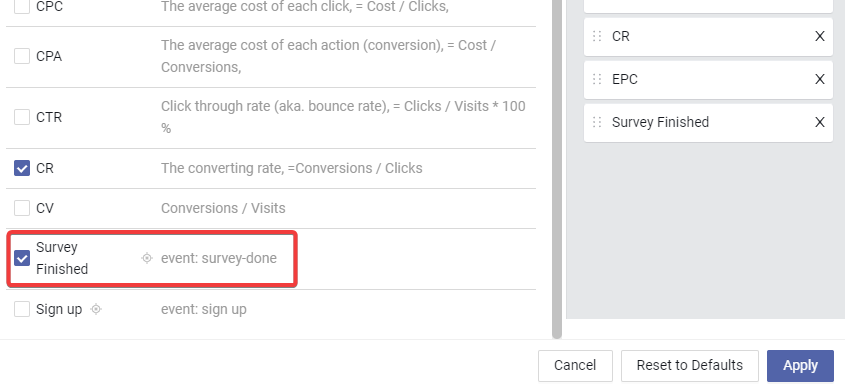
- In the column settings, enable the column of goal you just created, and click the Apply button.
FAQ
1. Can I host landers on different domain name?
All landers should be hosted on the same ROOT domain. For example, you can put the entry lander on https://page.mydomain.com and the final lander on https://thank-you.mydomain.com since they are on the same root domain mydomain.com.
But you cannot put the entry lander on https://page.mydomain.com while you put the final lander on https://thank-you.another-domain.com, it won't work.