Sales Status Tracking
If you are promoting sales offers such as COD, VSL, etc., you may need to track different sales statuses such as: pending, approved, and rejected. In this guide, we will show you how to track all these sales statuses so you get accurate reporting on what's working.
Step I. Find Out the Status Macro and Values, update the S2S Postback URL
First, ask your affiliate manager or consult their support: "What macro/token can I use to pass the sales status in the S2S postback, and what are the values for each status: pending, approved, rejected?"
For example, many affiliate networks provide a {status} macro to pass the sales status. Let's use this macro in our example. Suppose the values for each status are:
- InitCheckout status:
init-checkout - Pending status:
pending - Approved status:
approved - Declined status:
declined
Now you have the token and the value for each status.
Next, update the S2S postback URL so the affiliate network can post conversions with status.
Edit the affiliate network in the MaxConv dashboard. Enter the macro/token into the
Conversion Eventfield. This macro/token should be the value you obtained in Step I, which is{status}in our example.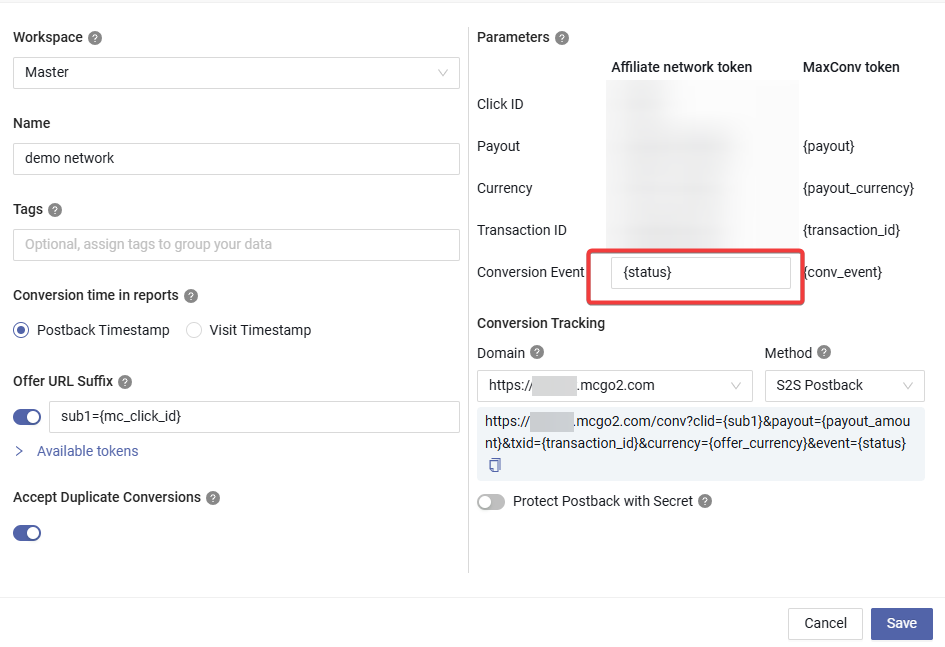
If your affiliate network can't provide a transaction ID macro, enable the
Accept Duplicate Conversionsoption, because MaxConv will deduplicate conversions byclick id + transaction id. If your affiliate network does provide a transaction ID macro, add it to theTransaction IDfield and keep theAccept Duplicate Conversionsoption off.Copy the Conversion Tracking URL and paste it into your affiliate network's postback settings.

If your affiliate network doesn't provide a token for sale status, then set a different postback URL for each status. Each postback URL should have a different &event= parameter value.
For example:
InitCheckout postback: https://**.com/conv?clid=...&event=init-checkout
Pending postback: https://**.com/conv?clid=...&event=pending
Approved postback: https://**.com/conv?clid=...&event=approved
Declined postback: https://**.com/conv?clid=...&event=declined
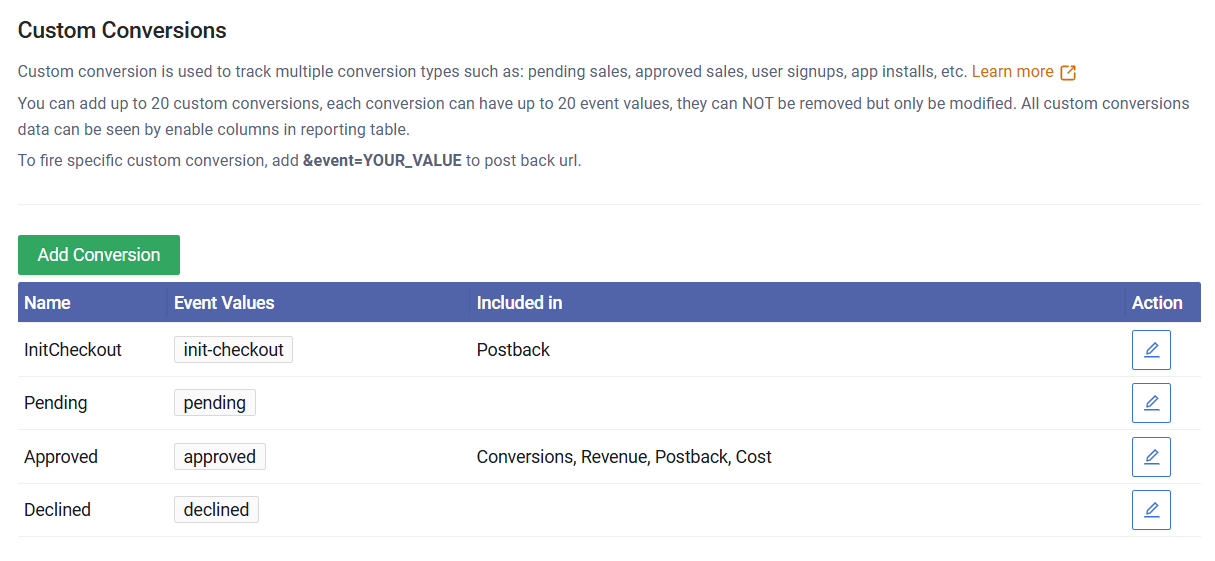
Step II. Create Custom Conversions
Now let's create custom conversions for each sales status. You will need the value of each status that you obtained in Step I. Go to Measurement >> Custom Conversions in the MaxConv dashboard.
Create a Pending conversion as shown below:
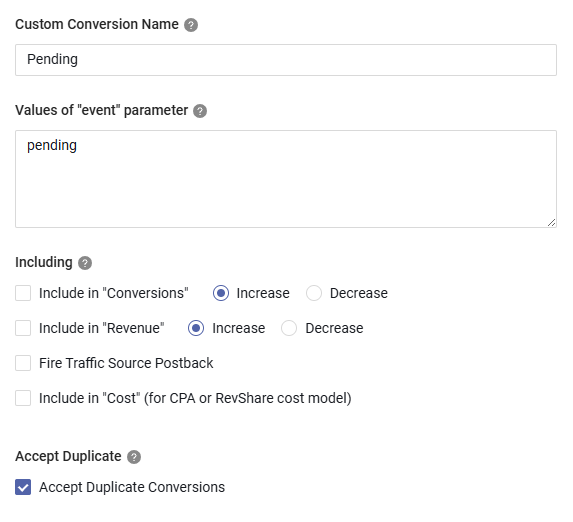
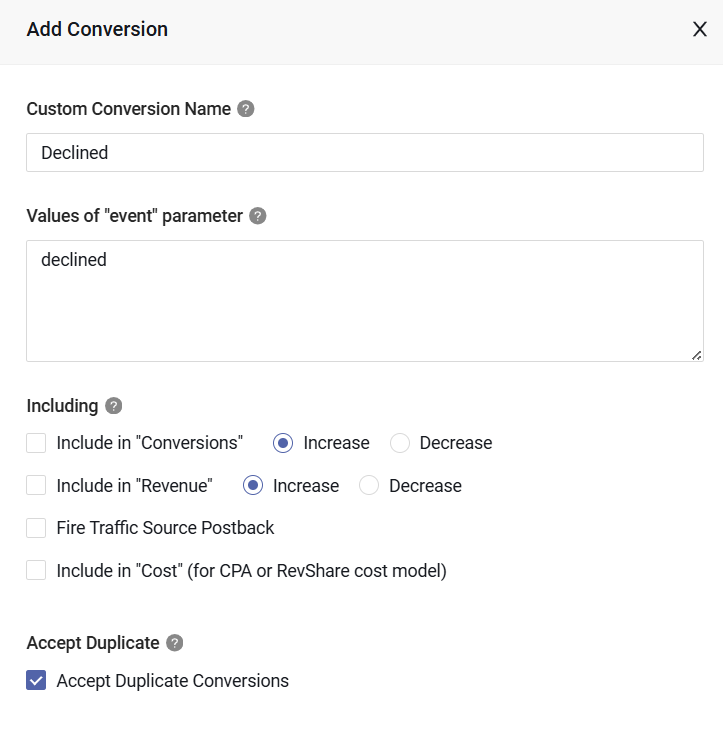
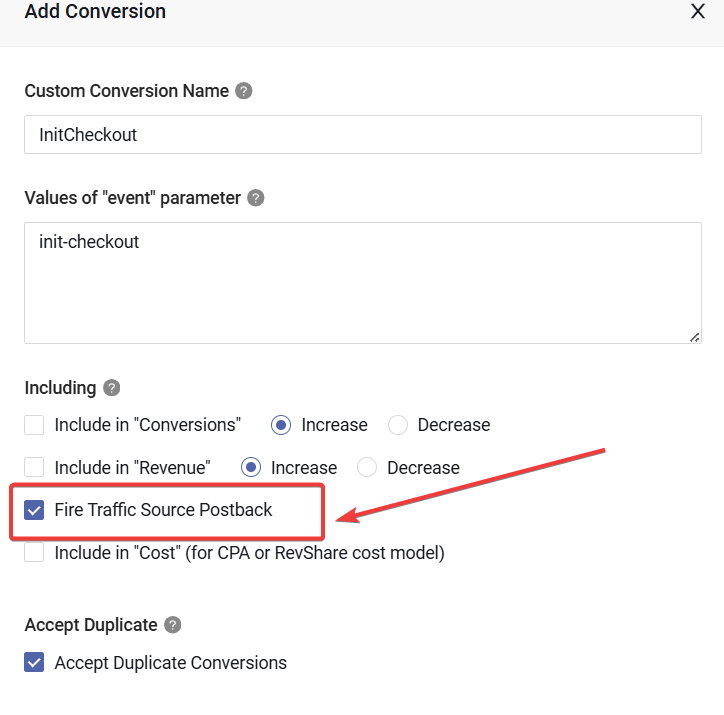
Custom Conversion Name: This is for your reference only.Values of "event" parameter: This should be the value you obtained in Step I. Ensure the value here is the same as the value in the postback URL&event=, case-sensitiveIncluding: Configure what you want to do for this conversion. For pending conversions, you may not want to add a payout, so turn off the "Include in Revenue" option. For other options, please check the Custom Conversions Document.
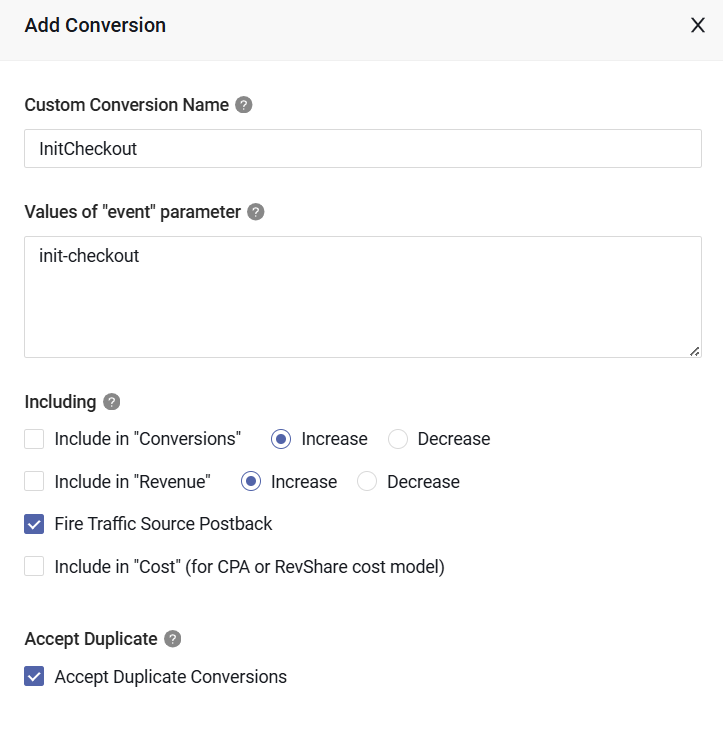
Create an InitCheckout conversion:
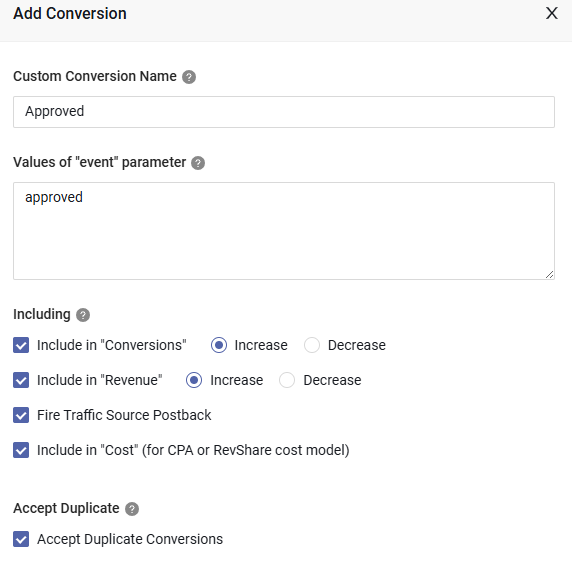
Create an Approved conversion:
Create a Declined conversion:
Now you should have three custom conversions:
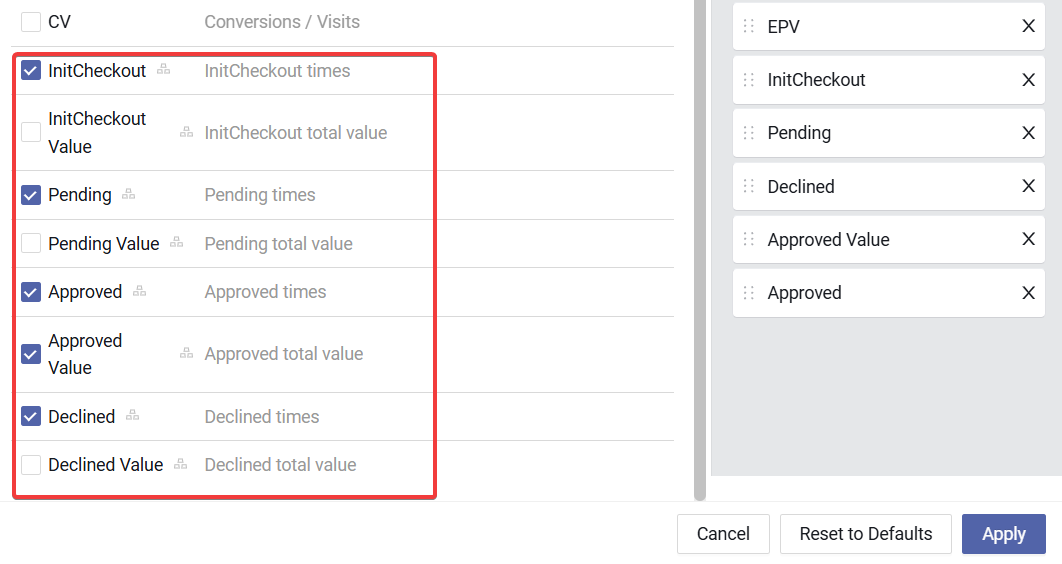
Step III. Enable Metrics in Reports
Now, enable these three custom conversion metrics in your reports.
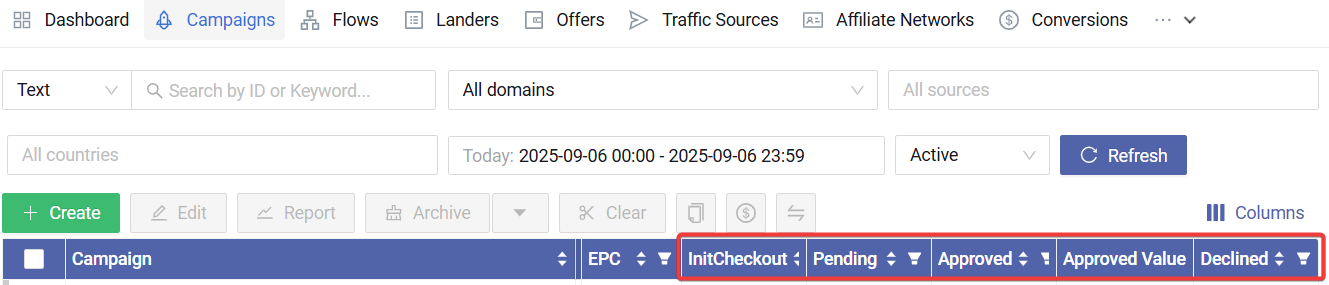
Go to the Campaigns page in the MaxConv dashboard and click the "Columns" button at the top right of the table:

Scroll down the metrics list, enable the metrics you want, and then apply them.
Now you can view these metrics in your reports:
Step IV. (Optional) Send to Traffic Source
If you want to send custom conversions back to traffic source:
- Ensure you have enabled the
Fire Traffic Source Postbackoption for that custom conversion.
- Enable the
Postback URL per custom conversionoption in Traffic Source or Campaign settings, and put the postback URL in it.
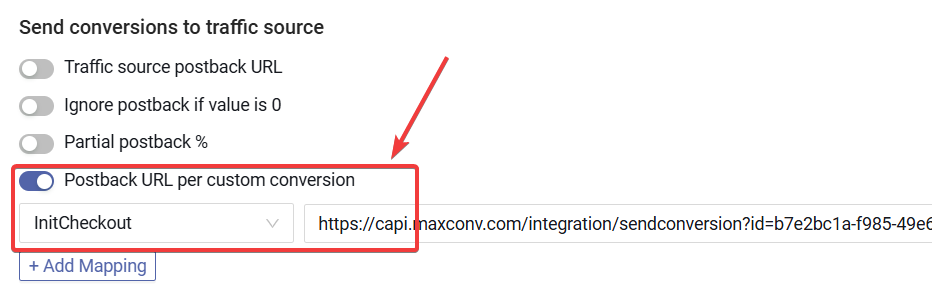
If you are using an integration, generate the postback from the integration and paste it here.
Step V. (Optional) Create Custom Columns to Enhance Reporting
Now you can see the sales status amounts and their values. But what if you want to get other metrics based on these sales statuses, like Approved Rate %? Our Custom Columns feature can help.
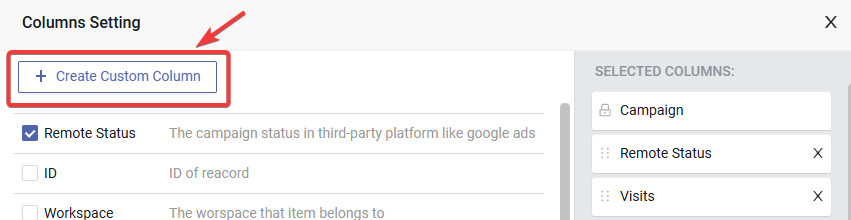
Open the columns settings again by clicking the "Columns" button at the top right of the table.
Click the Create Custom Column button.
Provide a
Column NameandDescription, then choosePercentagein the "Format" field, because we are creating a percentage column.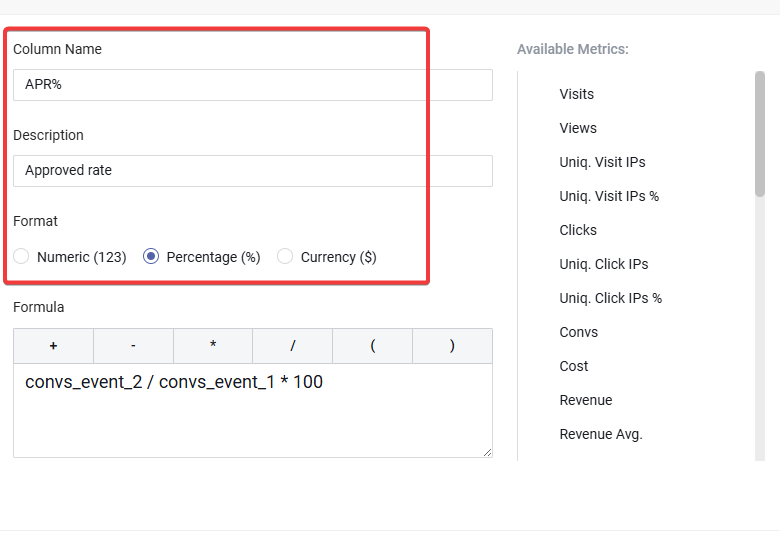
For the "Formula" field, we want this approved rate column to calculate
approved/pending. So:
<1> Click theApprovedmetric on the right,
<2> Click/at the top of the Formula field,
<3> Click thePendingmetric,
then add* 100, so the formula looks like: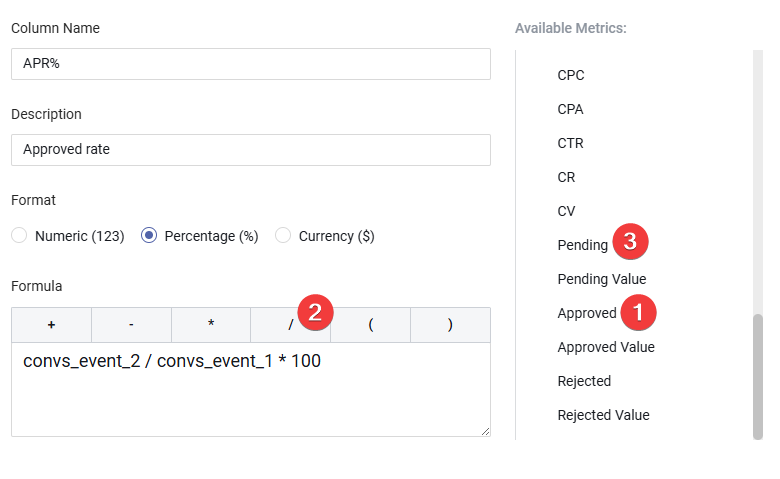
Click the Save button to create this custom column.
Enable the custom metric you just created.
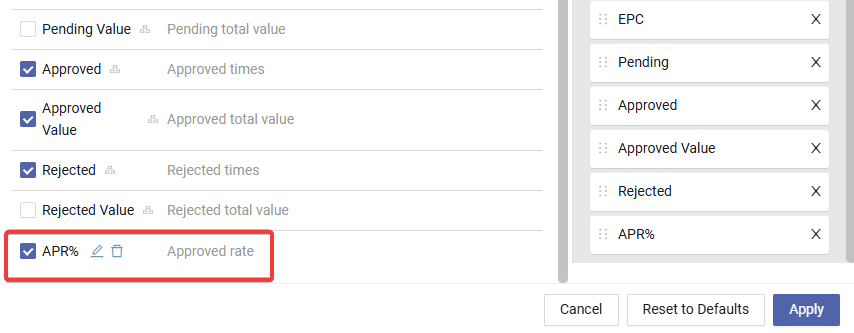
All set! You can repeat these steps and adjust the formula to create other custom columns as needed.