Custom Conversions
The custom conversions can help you track different types of conversions, such as: Add-Carts, Approved Orders, Upsells, Chargebacks, etc.
You can NOT delete custom conversions once they are created, so please organize your custom conversions before creating them.
Setup custom conversions tracking
To track a custom conversion, perform the following steps.

Click the Measurement >> Custom Conversions on the top right of MaxConv panel.
On the custom conversions page, click Add Conversion button.
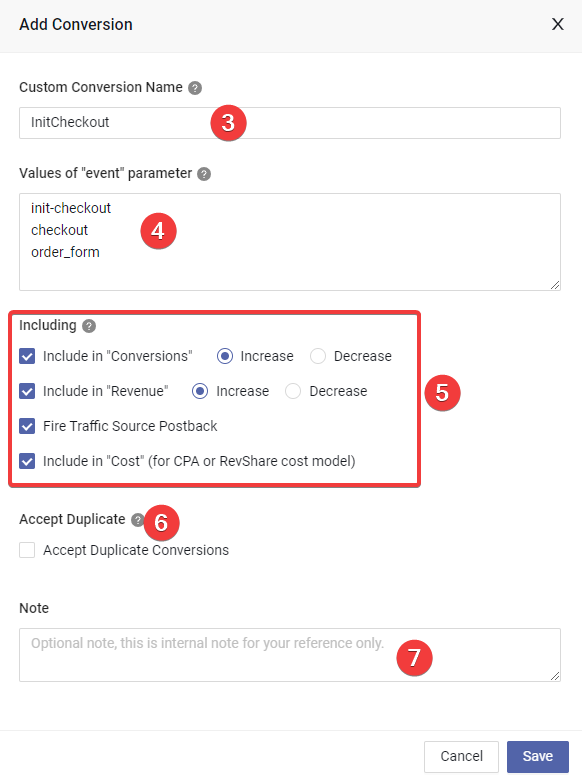
Provide the custom conversion name, which will be the column name in the report table.
Enter the custom conversion values one per line. It is recommended to use URL-safe characters, you can enter any string here, but please remember the string, we'll need the same string in the subsequent steps.
tipThe URL-safe characters are letters, numbers,
-and_.Configure the additional settings:
Include in Conversions: decides whether the custom conversions amount should be added to general conversions or not.
There are options to Increase or Decrease general conversions when custom conversions occur. If "Increase" is chosen, the general conversions will be increased by one when custom conversions occur. If "Decrease" is chosen, the general conversions will be decreased by one.
If you are tracking some kind of negative conversions such as uninstalls or chargebacks, you may want to choose Decrease.
Include in Revenue: decides whether custom conversions revenue should be added to general revenue. There are also Increase and Decrease options, which works same as option "Include in Conversions".
Fire Traffic Source Postback: Whether fire traffic source postback or not when a given custom conversion is registered.
Include in "Cost": Choose if the campaign cost should be added if campaign's cost model is "Revshare" or "CPA".
Choose if you want MaxConv to accept duplicate conversions even if the click ID and transaction ID are the same. You may want to enable this option if the custom conversions will be produced multiple times with the same click ID.
Type your internal note.
Click the "Save" button to create custom conversion.
Append the parameter
eventwith the value you have typed in Step 4 to the postback URL, and update the postback settings in your affiliate network platform. For example:https://YOUR-TRACKING-DOMAIN.com/conv?clid=...&event=init-checkouthttps://YOUR-TRACKING-DOMAIN.com/conv?clid=...&event=checkouthttps://YOUR-TRACKING-DOMAIN.com/conv?clid=...&event=order_form
init-checkout, checkout and order_formare the custom conversion value you have provided in Step 4, use one of the values.tipIf you don't use S2S postback url, you can append the parameter
eventto the conversion tracking pixel, for instance:<img src="https://YOUR-TRACKING-DOMAIN.com/conv.gif?event=init-checkout">or
<script src="https://YOUR-TRACKING-DOMAIN.com/conv.js?event=init-checkout"></script>
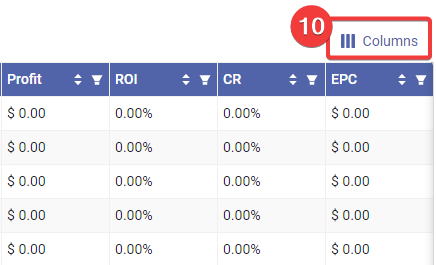
- Now you need to enable the custom conversion column in report table, click the Columns button on the top right of table.
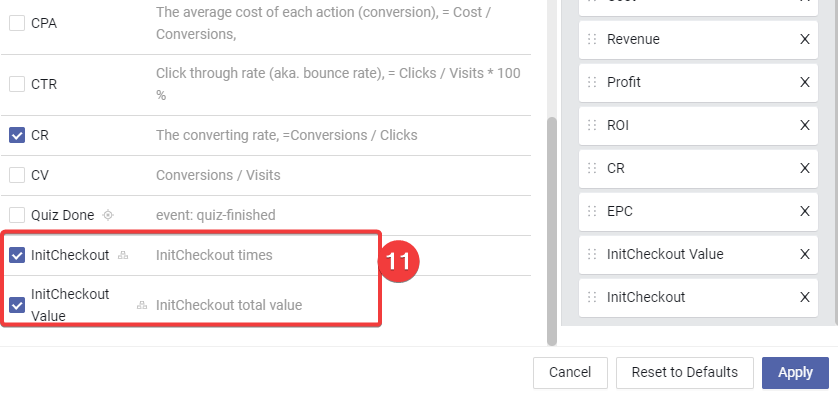
- In the column settings, enable the columns of custom conversion you have just created, and click the Apply button.
Send custom conversions to traffic source
When you want to send custom conversion data to traffic source platform, follow these steps:

- Make sure the Fire Traffic Source Postback option is enabled in custom conversion setting.
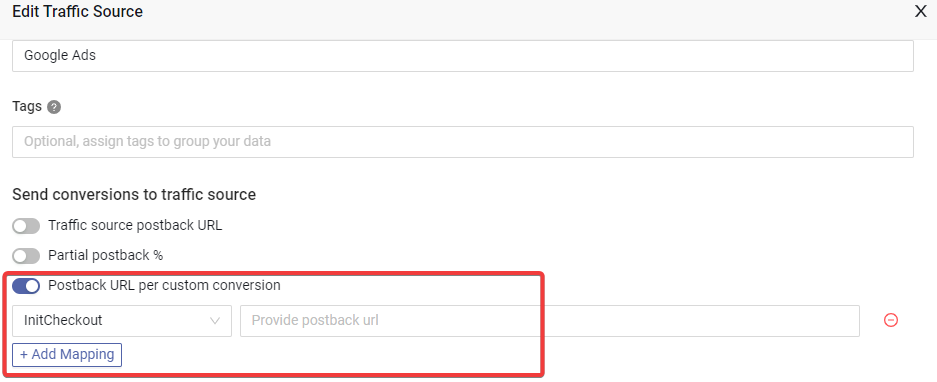
- Edit the traffic source setting, enable the Postback URL per custom conversion option, choose the custom conversion and type the postback URL accordingly.